Countless times I have mentioned that we need to monitor indoor and outdoor air quality. This is an essential step in order to have a holistic approach to air pollution that surrounds us in both environments. Unfortunately, not everybody can afford to buy two monitors but thanks to the community and AirGradient there are two DIY solutions that can help us monitor the air quality quite accurately and of course, manage the air we breathe better.
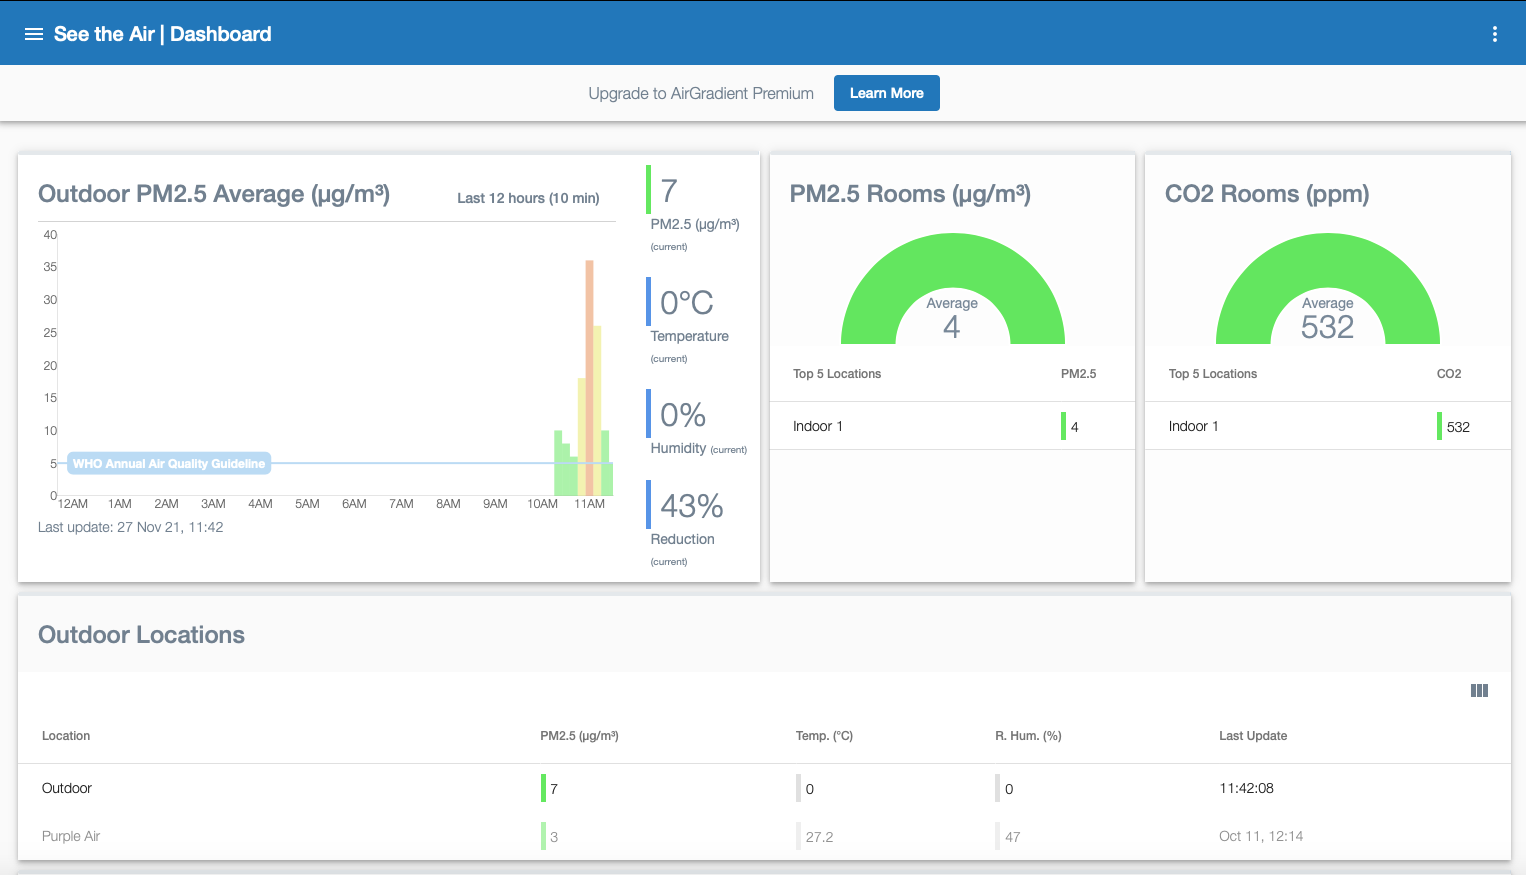
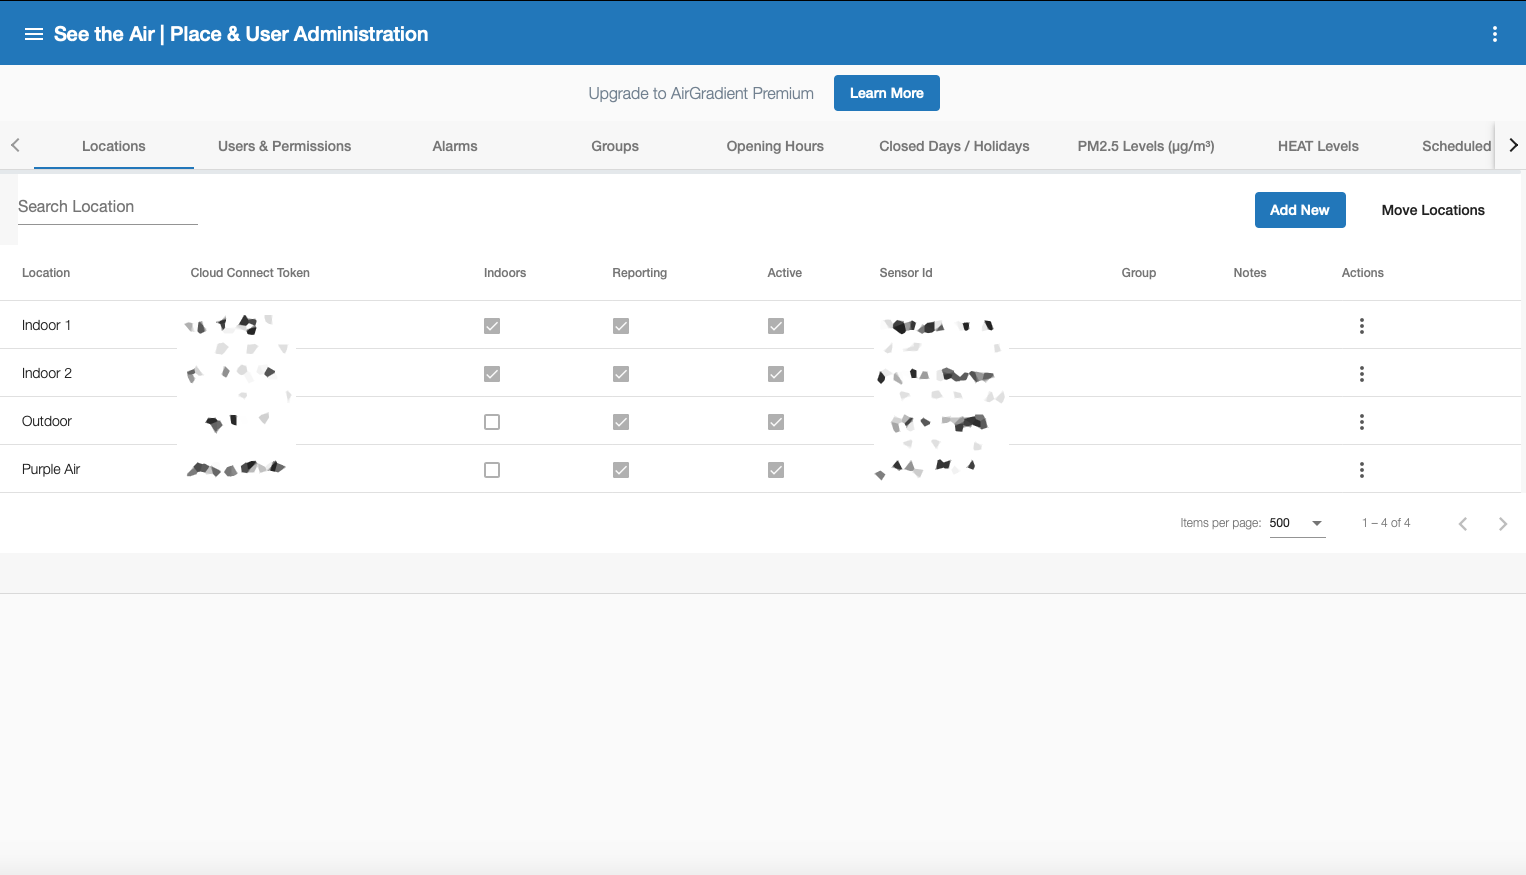
AirGradient’s DIY solution is more appealing than the competition for many reasons. First of all, you can buy directly the DIY Kit with all the electronic components from them including the PCB. The PCB is the board where we will deploy all the sensors, WiFi module, and display. That is a huge benefit because you don’t have to search on the internet and purchase the components one by one. The well-designed PCB will also help us keep the monitor neat and small without unnecessary cables. Secondly, Air Gradient’s DIY AQ Monitor is very customizable allowing us to build an indoor monitor with an NDIR CO2 sensor but another one without a CO2 sensor or display for the outdoor environment. If you don’t want temperature/humidity sensors you can easily omit them too, but I highly recommend them. Moreover, there is software support as a community of passionate people have been improving the firmware constantly. Finally, the solution comes with a web dashboard where you can manage all the monitors and take advantage of the histograms and tools like the alerts.
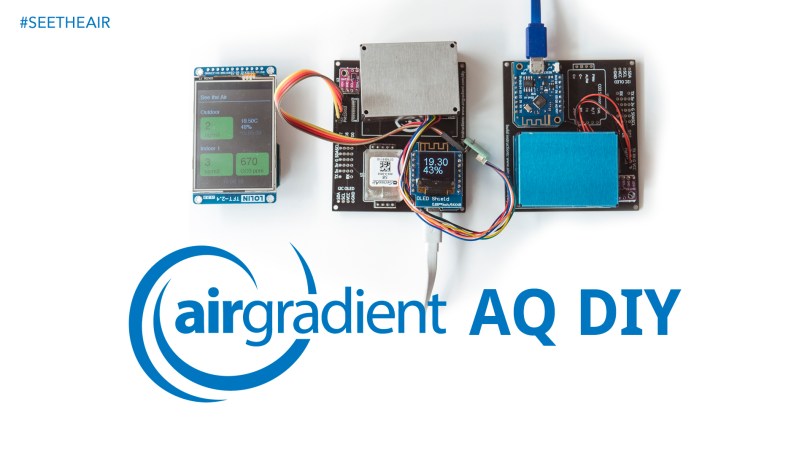
Additionally, the devices which are connected to the cloud and the dashboard can broadcast the measurements back to a separate display (Viewport) which allows us to see the air quality indoors and outdoors like in the example below. Isn’t that very cool?
It has been a long time since I soldered something, so I was very happy to build the monitor. I built two monitors by following the fairly easy instruction here. There is also a video with the instructions here by Jeff Geerling.

Hardware
The first monitor is meant for indoor environments and has the following 5 components.
- Plantower PMS5003 PM2.5 Sensor
- Wemos D1 Mini ESP8266 WiFi Module
- Wemos OLED display (64×48 pixels)
- Senseair S8 CO2 Sensor
- Sensirion SHT31 Temperature and Humidity Sensor Module
The second monitor is meant for outdoor environments and has the following 3 components.
- Plantower PMS5003 PM2.5 Sensor
- Wemos D1 Mini ESP8266 WiFi Module
- Sensirion SHT31 Temperature and Humidity Sensor Module
The third device is designed to link the measurements from both monitors into one place and has the following 2 components. I call it the Viewport.
- Wemos D1 Mini ESP8266 WiFi Module
- 2.4“ inch 320×240 TFT LCD Touch Screen shield
The PCB is also open-source, so you can print it on your own or even further develop it here.

Software
The firmware is very stable and the dashboard as well, making the whole experience very pleasant. The only thing you have to do is to install the Arduino IDE (macOS or Windows or Linux) and then you have to install the ESP8266 with the board manager and then the AirGradient library through the Library Manager. You will find the detailed step by step instructions here.
http://arduino.esp8266.com/stable/package_esp8266com_index.json Have a look at the forum where people discuss various subjects related to monitors and air quality/pollution.
Request: Please create a plug-in for HomeBridge/HomeKit users!
Enclosure
For a better-looking monitor, AirGradient provides 3D Enclosure and Mount STI Files here.
Conclusion + Giveaway
This project is worth your DIY time. Inexpensively, you can build a robust ecosystem of air quality monitors for indoor and outdoor air quality monitoring. The AirGradient DIY Kit and the dashboard offer almost the same solutions as a paid air quality monitor for a fraction of the price. Also, it is a great educational experience for schools all around the world.
Two lucky people will receive an AirGradient’s DIY PCB each for free, including shipping costs anywhere in the world. The only thing you have to do is to comment below and I will draw randomly two winners on 12-12-2021. Make sure to include your social media account (Twitter, Facebook, Instagram, or Reddit but not your email) in order to reach you back.
Discover more from See The Air
Subscribe to get the latest posts sent to your email.

Sotirios, thank you for posting about our DIY kit.
I am more than happy to answer any questions that might come up during the built and we also have a great community on our forum that helps each other and discusses new ideas around air quality monitoring.
LikeLiked by 2 people
Nice DIY project
LikeLiked by 1 person
That’s fun : )
LikeLiked by 1 person
Congratulations Dimitris you are one of the two winners.
LikeLike
I actually want to win this, assemble it and gift it to a friend who works in Downtown LA
LikeLiked by 1 person
Good luck!
LikeLike
Congratulations Sero you are one of the two winners.
LikeLike
still have more airRohr parts that i hope to deploy. happy to see your coverage on this. if you want someone int he US to build please consider dave the wave! twitter: dchirp
LikeLiked by 1 person
cool!
LikeLike
wordpress snafoo – twitter : dchirp
LikeLiked by 1 person
This review is perfect timing. Living in an old (85+ yr) house and not always knowing what’s in the walls, I’ve been slowly improving air quality for the past few years. Dehumidification, filtration, etc. The missing piece for me was monitoring and I think this might be exactly what I was looking for. Would love to win and try this out. Fingers crossed!
Instagram: bourquekevin
LikeLike
Thanks Sotirios for this! I will order one ASAP, and if it is what I expect, I will get more for a future AQ school project.
On the airgradient site I just don’t see the way to add also the Viewport part to the system. Maybe you can explain how to do it? How to program the monitor in order to see the results of internal and external AQ on the larger TFT display and on the computer dashboard?
Thanks a lot!
Greetings from a relatively clean air Athens these days, luckily!…
LikeLiked by 1 person
Andrea, here are some of the things that might help you.
DIY built instructions for the viewport (we call mini displays) including firmware code:
https://www.airgradient.com/resources/airgradient-diy-display/
To configure the mini displays, i.e. what room they should display go to “Hardware Administration”, “Mini Displays” and then configure it there.
We also have a configuration for larger public displays and website widgets under “Hardware Administration”, “Public Displays”.
I am interested to learn more about your plans for the AQ school project and ways we can support it. Please drop me a line at support@airgradient.com to talk about it.
LikeLiked by 1 person
Thank you very much for your help Achim! I will write you an email. Cheers!
LikeLike
A really interesting article thank you. A great DIY project that I would love to complete.
LinkedIn- James Hallworth MRICS
LikeLiked by 1 person
[…] some very good DIY air quality monitors for indoor and outdoor applications to consider like the Air Gradient and […]
LikeLike